A week after making the masa ready, I gave attention to my paper registration guides (right). Double click on images to make larger.
I planned for both the small and large reduction linocut blocks to have a 3 inch border. Could I fashion wood to make the rig units I needed?
With a yardstick and pencil, I went outside to gather materials from my wood shed, and a handsaw to cut with. My storage shed, once a studio, built by me, housed tools.
A narrow lath board would be glued to a 2 x 1 pine board to make the vertical side of the rig. A single lath board would make the horizontal side.
After sawing, each of the eight inch lengths were made even with sandpaper.
Before applying glue I scored the side with a piece of steel (left).
The vertical and horizontal units were glued separately.
After the wood glue dried I discovered the rig units were taller than the depth of the lino blocks.
By clenching each rig unit between my shoes I was able to saw units in
half length wise. Left, you can see the rig is lower than the thickness
of the block. I scored the wood pieces, glued the two units together, and waited
for them to dry. Then I gave the dried rig a coat of Polyacrylic. (So that any ink
smudges could be wiped off, during the printing process.)
Finished rig in my hand.
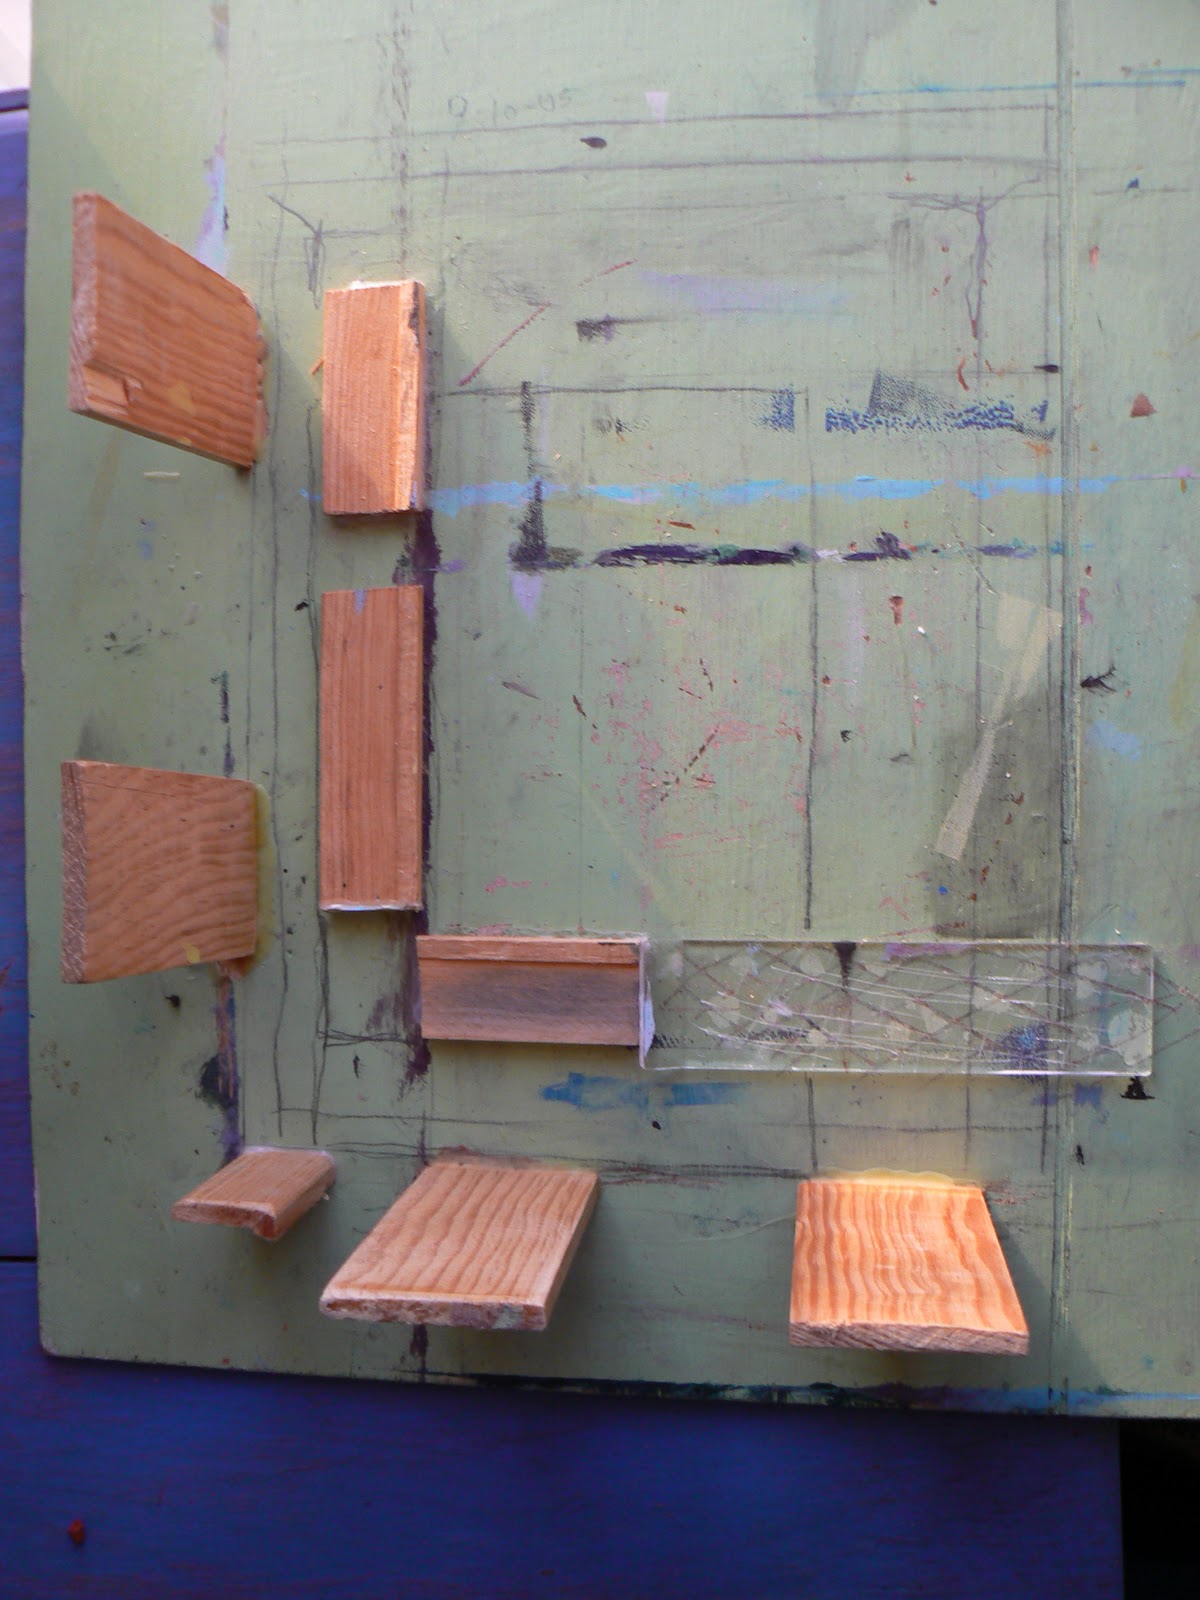
I re-measured the vertical registration guides and found two of them to be off
by half an inch. So I snapped them off the board, scored the board, and
glued them the distance I wanted. Now the guides are even.
My paper order arrived from New York City. The masa came in standard sheets measuring 21 by 31 inches. (above) For my next project I require sizes 12 by 10 inches and 18 by 15 inches. Steel ruler in hand I measured each sheet, made pencil marks, and tore the sheets to the needed sizes. The uneven torn edge is important to that project. Click on 3 minute video.
Masa is a white paper, made by
machine out of 100% sulphite. Sulphite is a chemical wood-pulp obtained by cutting wood into small pieces and cooking it with calcium bisulphate or sodium sulphite to remove natural resins and break down the cellulose fibers. While sulphite does have a short fiber, it increases bulk, softness, and absorbency, which are important qualities for a variety of techniques. Masa has a neutral pH. It is smooth on one side
with a light texture on the other. It weighs 77 gsm. To give you an
idea of its weight, tracing paper is 30 gsm, a standard bond eucalyptus paper used for typing is 75 gsm, and a heavy etching paper such as Rives or Arches is
typically 250 gsm. When hand printing is used, lighter weight sheets are easier to burnish and transfer more ink from the plate or block. (courtesy of New York Central Fine Art Papers, 62 Third Avenue, New York, New York, www.nycentralartsupply.com, accessed January 19, 2012)
Next, comes adjustments to my registration guides.
Earlier this month I was thinking about the color woodcuts of Frances Gearhart.
Double click on images to see enlarged. Just finishing another beveled plywood woodcut (above) with water reflections in the foreground, a shaded bank in the middle, and some foliage over that. Wondering how a solid color could be added behind that image and what that might look like.
Woodblock artist Ansei Uchima described the way he made sure one print was carefully lined up on top of another. His solution was to secure his woodcut block to a printing board "with nails flush against the bottom edge and the corner of the block." There was more to his method, but it dawned on me that printing a second impression on top of the first one would take some thinking and lots of trying.
This particular post is about not having all your facts together. Sometimes you have to jump into it, and try something, follow your hunch, do it, not know everything, just "try it out."
The hunch that came to me was to ink the blank side of the plywood plate and print that on several separate sheets of paper. Then, after those were dry, possibly ink the top woodcut, line it up, and print it on top of the solid color background.
One day I had the right kind of energy to do some inking. I set out my long boards for the prints to dry on. I had typing paper to practice on. Some nice brown Kraft paper and some American Masters 90 lb printmaking paper from Utrecht. At the beginning, I drew an outline of the woodcut block on my printing board. I centered a sheet of typing paper on the uninked block, and drew an outline of that sheet on my printing board. Both of these marks served as guides for lining up my prints. One of my goals was to line up prints BY USING MY EYES AND MY HANDS.
This is what a print can look like when the plates do not line up.
Click on the right hand X on the Google ad (when it appears) and it will disappear.This six minute video shows inking solid blocks of color. I am mixing water soluble white acrylic tube paint with water soluble black Speedball ink. You will see the pattern that the burnisher makes on the print when I pull it up. To get an even print one must apply even pressure all over the back on the print. The first print usually has no color, not enough ink reaches the paper, or the ink is not the right consistency. The more I used the Speedball ink, the richer the print looked to me.
Here is one try at a solid color block.
Another try on Kraft paper. Notice the uneveness of the ink, where I did not burnish the back of the paper. Some print makers might like that particular effect. I was trying for a solid color.
Click on the right hand X on the Google ad (when it appears) and it will disappear. This three minute video continues the process. I am trying to line up a dry print in my hands with a second impression on wet ink. Technically two colors. You notice I am mixing ink as I go. I did not analyze the results until the ink had dried. Merely spreading out prints to dry overnight, and gathering them up the next day. Figuring each step out takes a certain kind of energy. Work at your own pace.
An example of two color print or one print on top of another. Double click on image to see color variations.
This is two passes of blue and one upper pass of green. Three impressions in all. Top image was printed on Kraft paper. Bottom image was printed on typing paper. The green swatch would make the top of the water reflection image look more like foliage. In the end it did. So this was a good calculation.
Click on the right hand X on the Google ad (when it appears) and it will disappear. This six minute video has me building up the consistency of the ink for the water reflection woodcut. You can see the first "impression" or print is garbled. I am trying to ink it a little bit more each time. The person rolling on the ink controls the amount of ink on the plate.
Notice the little dots on this impression. The paper was not even burnished on the back.
The same impression was printed twice.
The same impression was printed twice. Blue ink the first pass, black ink the second pass.
Click on the right hand X on the Google ad (when it appears) and it will disappear. In the Block Color 4 video I am ready to print the reflection woodcut on top of colored background.
One attempt. Are the blocks lined up right?
Another attempt.
Another attempt.
Click on the right hand X on the Google ad (when it appears) and it will disappear.One minute video. Below are Glidden Road and Quarters prints on top of various solid color blocks.
In the "trying and attempts" there is experimentation, and you find out if your hunches were right or not. Some of the images above are slightly tipped, well, yeh. But I discovered that prints that were created toward the "end of my trying" looked the best. So, lining up prints with EYES AND HANDS can work.
A week later I examined my sixty four dry prints. There were not enough prints that looked so much alike that they could be part of an "edition." Just to illustrate this point take a look at the two prints (above). Double click on images to see the detail. An edition of numbered prints can not and should not have this much difference between the prints. As I am still learning about inking, burnishing, printing...rather than "fidget over what I have printed so far".......I have decided to move on.
Now I am putting ideas down on paper (above) and using a black marker where the darks should be. My interest lies where light regions turn into dark ones. A better place to work out the design is on paper. It is time to put some thought into my next piece.
"Me at the Instruments - Stearing My Underwater Vessel- Complete With Sonar Equipment And Air Tanks" by Karl Marxhausen. Pencil and Wax Crayons on Paper, March 3, 1990, Norwalk, California
Translate
I'LL TELL YOU SOMETHING ABOUT MY HUSBAND KARL.
WHEN HE JOURNALS AND COLORS AND DRAWS ANDWRITES ----- WHEREVER HE IS ------IT TAKES HIM AWAY. IT MEANS SO MUCH TO HIM. REMEMBERING GOD'S PRESENCE.
JAN MARXHAUSEN
Nelson Atkins Print Society Presentation: Intersections With Fred Geary - Karl Marxhausen
THIS IS THE SATISFACTION OF RESEARCH. +++ WHAT THE LORD BRINGS YOUR WAY FOR YOU TO FIND +++ AND THE ENERGY TO PURSUE THE DOORS HE OPENS.+++ BLESSED BY HIS NAME. +++ JOEL MARTY
IT WAS A YELO CAR. A BRIGHT YELO CAR. SEVERAL OF THEM. AS THEY PASSED BY, I COUNTED THEM. THEN AN IMPRESSION CAME - I WAS NOT ALONE. THAT I WOULD FIND MY DESTINATION. AND I DID. BUT IT WAS THE LARGE "K" ON THE SIDE OF THE RED BARN WITH THE WHITE CIRCLE AROUND IT THAT MADE ME CRY. MY FIRST NAME STARTS WITH A "K." AS WE PULLED INTO OHIO THERE WERE THREE OVERPASSES WE DROVE UNDER. NOT A RUSTY BROWN OR DINGY GREY. ALL THREE WERE BRIGHT CANARY "IN-YOUR-FACE" YELLOW!!! THREE IS MY FAVORITE NUMBER. HOW TO EXPLAIN IT. FOR ME, IT WAS A PRESENCE BESIDE ME, REMINDING ME I WAS BEING THOUGHT OF, I WAS NOT ALONE. OFTEN ABSENT FROM MY THINKING, SURPRISES COME. MY ANXIOUSNESS IS TAKEN AWAY. CALM SETTLES IN WHEN HIS KINDNESS COMES. karl marxhausen
"ABOUT YOUR DAD: THE BLESSING THAT CAME INTO HIS LIFE WAS CONCORDIA. THIS SETTING HELPED HIM BECOME THE PERSON HE "BECAME."AND BY SETTING I MEAN THE COLLEGE AND THE CITY OF SEWARD. NO QUESTION ABOUT IT. IT WAS THE PERFECT SPOT FOR HIM."
JACK DUENSING, SEWARD, NE.
Followers
owner of "Sundown" from Seward, NE
Welcome. In retirement my art shows up as words typed on the page. The world of Harry Alfred Fowler fascinates me. My town is a rural farm community. Fowler worked in Kansas City. He brought art folks together. I've been pursuing discovery since 2011. Like Fowler I am gleaning from many sources to share the delightful nuggets that appeal to me. I too have organized, self-published, done art, learned, tried it out. New ground, new discoveries, these fuel my dreams. A book of my own with drawings. In the meantime there are dishes to wash and daily routines to follow. Thanks to friends around the globe who have been a resource to me. History ties a name to a place and a time and then is published and used by the rest.
"SOUNDS LIKE GOD HAS BLESSED YOU WITH YOUR ART. YOU ARE AN INSPIRATION TO MANY!!"SANDY QUICK, KANSAS CITY, MISSOURI
"MAKES PERFECT SENSE TO ME, KARL. I UNDERSTAND THE PRIORITIES OF KIDS. YOUR DAD WAS JUST A "REGULAR DAD" EXCEPT THAT HE TOUCHED A LOT OF PEOPLE'S LIVES, AND THAT MADE HIM EXTRAORDINARY!!!" MATTHEW G. HANSEN, LINCOLN CAPITOL PRESERVATION ARCHITECT
"ALWAYS ENJOY YOUR BLOG, KARL --- YOUR FUN STORIES, CREATIVE WORKS, AND PHILOSOPHIES ON LIFE!! THANKS!" LOIS MEYER VOELTZ
"HOW COOL IS THAT KARL!! CONGRATULATIONS AND KEEP AT IT - YOU ARE DOING WONDERFUL WONDERFUL WORK."RICHARD HAMILTON, KANSAS CITY, MO
"KARL PAINTS WITH STRONG STROKES - SOMETIMES ALMOST SLASHES. HE SAYS IT ALL, FEARLESSLY, IN A FEW WELL CHOSEN WORDS FROM HIS PALETTE. HIS SUBJECTS ARE SIMPLE EVERYDAY THINGS THAT HOLD THE GREAT PLEASURES." PHIL CHADWICK, PAINTER, ONTARIO
"BRAVO KARL. YOUR LANDSCAPES ARE REALLY NICE." ELIZABETH KRUSE, PASTEL ARTIST, MISSOURI
"IT IS GREAT TO SEE THE WONDERFUL ENERGY OF YOUR PLEIN AIR PAINTINGS. I LOVE THE LOOSENESS THAT YOU ARE GETTING AND REALLY FIND EACH ONE A VISUAL TREAT."SUSAN BRASCH, painter,NEBRASKA


 large reduction linocut blocks to have a 3 inch border. Could I fashion wood to make the rig units I needed?


 After sawing, each of the eight inch lengths were made even with sandpaper.
 I was able to saw units in
half length wise. Left, you can see the rig is lower than the thickness
of the block. I scored the wood pieces, glued the two units together, and waited
for them to dry. Then I gave the dried rig a coat of Polyacrylic. (So that any ink
smudges could be wiped off, during the printing process.)
I was able to saw units in
half length wise. Left, you can see the rig is lower than the thickness
of the block. I scored the wood pieces, glued the two units together, and waited
for them to dry. Then I gave the dried rig a coat of Polyacrylic. (So that any ink
smudges could be wiped off, during the printing process.)

 Now the guides are even.


