Monday, January 10, 2011

linoleum cutting

 
With tools purchased some months ago, a "snow day" at the beginning of the work week, an eraser, the back of a cradled support, jazzy music, warm stocking feet, and hot cocoa....I try my hand at a lino cut.

One minute video of cutting setup. Click on the X of the Google ad when it appears, and the ad will disappear. The 3.75 by 4.75 inch linoleum rectangle is secured to the back of a cradled support with tape. The support rested on a rubber eraser, which enables the support swivel and rotate as needed. Double click on images to see larger.
Pencil drawing on lino pad based on ABOVE photo. Next, went over the pencil drawing with thin Sharpie marker.
Cutter tip loaded into the cutter handle after loosening the chuck. Followed directions: After securing the blade in the handle, position your forefinger as close as possible to the cutting edge. As a safety precaution while cutting the block, position the hand holding the block behind the hand holding the tool. Apply even pressure, and ease off when completing the cut, It is not necessary to dig deeply into the block.
                 
Eight minute video. Click on the X of the Google ad when it appears, and the ad will disappear.


Click on 3 minute video tiny cuts.
 The inking portion did not seem so exciting to me. Not able to find a glass pane I improvised with aluminum foil.
 
click here for 5 minute video inking lino pad. Decided to roll water soluble acrylic paint out with brayer on aluminum foil.
Turquoise Speedball water soluble ink printed on dry typing paper.
Here is same print on black paper.

Used bristle scrub brush, soap, and water to vigorously wash off ink on lino pad.
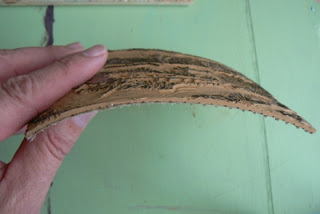
After drying with clean cloth, the linopad want to warp -- so I sandwich the pad between two layers of paper towels on the table. Then I pile a couple heavy books on top and leave it to dry overnight. In the morning the pad is dry and flat.

I am exactly like anyone else who has not tried a new medium before. I do not know what my efforts are going to look like. I see the results and immediately hate what I see and want to throw it away. Inspite of my feelings my wife tells me it looks good. Well.... I must follow the same advice I hand out to any beginner. "Put the artwork aside, sneak looks at it from time to time, and let it grow on you." I will tell you this much--I enjoyed cutting it more than printing it. I want to try another one. And I certainly have gained a better understanding of the process myself. Now when I look at a linocut by another, I know more of the work that went into a piece.
Route E Snow, linoleum pad, 4 by 6 inches (above) Last impression (below)
After looking at the print over a couple weeks, I went back in and cleaned up the image. I like it better now.

Saturday, January 8, 2011

organic and abstract

The 23rd Annual Artists Choosing Artists Exhibit features artwork this month by Burkholder Project member artists and their guests in a variety of mediums. The artist I chose for this exhibit is my wife of 28 years. Her work (below) is beside two of my paintings. The exhibit runs January 4 - 29, 2011. The gallery is located at 719 "P" Street in Lincoln, Nebraska.
Before I met Jan Nelson Marxhausen, she was a diversified artist. She boldly created wood sculpture and clay figurines. In her oil painting RED SKY (above), she experimented with abstract and organic forms. That took guts. Double click on image to see it larger These days she works with over one hundred students. She teaches kindergarten through sixth grade ART at Carrollton, Missouri. Her artistic gusto continues to amaze me. Below are a couple examples of her sculpture that are not in the show.

"This is called Spring Chick. It was made from metal parts I found at a junkyard in Seward, Nebraska. The body was a rusted air duct. The beak was made from two plow pieces. The wings were two car visors. It had a long curved metal tail. The eyes were made from rear view mirrors on a Jeep, I think. I welded it together in class. I can't remember if it was arc or acetylene. We learned how to do both. My sculpture instructor was Don Dynneson. We had class at the Art Annex. It was a house the art department used, across the street from the administration building. Concordia used to be a teachers college, but now it is a university."
"This figure is called Joy. It was another assignment our teacher gave us. Dynneson had some log chunks to pick from. They were probably walnut. The first thing he had us do was make a "mock-up thing out of wax." That gave him an idea of what we wanted to make. It was part of the process. With a chainsaw, the bigger chunks were removed. I used wood chisels and a mallet (made out of a wooden bowling pin) for the finer cuts. A power sander was used with different grades of sand paper to make the rough areas smooth. The work was rubbed it down with linseed oil. A layer of furniture wax or floor wax was used for the final coat. It was made out of ONE piece of wood."
Photo of artist, Jan Marxhausen (above).
For examples of sculpture by her former professor, click HERE and HERE and HERE.

(Interview with artist Jan Marxhausen January 8, 2011. Painting and sculptures courtesy of private collection by artist. Professor Dynneson sculpture links, courtesy of City of Olathe, Kansas, http://www.olatheks.org/GIS/SculptureMap/ods_07_catch,
http://www.olatheks.org/GIS/SculptureMap/ods_07_firebird, http://www.olatheks.org/GIS/PermanentSculptureMap/pos_ferro, May 21, 2007 post http://www.shareandenjoyblog.net/2007/05/21/what-a-bird#more-284 accessed January 8, 2010.)